

How To Create Iso In Windows 10
Installing Windows 10 is piece of cake; as a Windows ambassador or proficient user, all you have to do is download an ISO from Microsoft, burn it to an external device and utilise it to boot the PC or laptop.
In 15 to 30 minutes, yous'll have a clean, fresh Windows 10 installation, but it still will require some work before information technology's ready for product utilize. Y'all'll demand to install software and the desktop and personalize the Start menu to run across your requirements. Then, you'll demand to echo this procedure for each of your PCs and echo that procedure whenever a reinstall is necessary.
In that location is a unlike method you can take. First, yous should install Windows 10, customize it to your needs, install all the software yous need, capture that installation and use it to create an ISO. Using this customized ISO for your installation media, you need one-half an hour to clean install Windows ten with all your software and personalization. When y'all want to change something in your ISO, add together or remove software, change personalization, or update or upgrade Windows 10, you just update the image and create a new ISO. Information technology's fast and easy to exercise, and it can piece of work for any Windows administrators.
Getting started with a custom ISO
To create a custom ISO, you need install media for your preferred Windows x edition and software, a technician motorcar -- a Microsoft term that means a PC on which yous can build Bone images -- and about twenty minutes longer than it would take to clean install Windows 10 and all your software once.
The process of creating a custom ISO breaks down into v distinct parts:
- Install Windows and prepare assets while installing
- Update and customize Windows, install software
- Generalize Windows image with Windows Organization Preparation Tool (Sysprep)
- Capture Windows paradigm, create the ISO
- Update/Change the ISO
Autonomously from any software you lot pre-installed in your Windows image, you don't need any third-party tools, apps or other software; everything is done using native Windows ten and Microsoft tools.
Y'all should follow these steps to create a custom ISO for a Windows 10 desktop.
1. Install Windows and prepare assets
Install Windows normally until it stops at the Region Selection screen after the last reboot. When the desktop requests a product cardinal, select the "I don't have a product key" option. Windows does non need to exist activated for this process.
This instance uses a Hyper-V Generation i virtual machine (VM) every bit the technician automobile, with a 64 GB virtual hard disk. Earlier starting the VM, y'all should change its settings to employ Standard Checkpoints instead of default Product Checkpoints.
Installation takes 15 minutes or so to complete. While it's running, yous have time to gear up some assets on your host car. First, download and install the Windows 10 Assessment and Deployment Kit (ADK). Next, create an unattended answer file using the Windows System Image Manager (SIM), which is role of the Windows ADK. Don't panic even if yous are a Windows SIM newbie. It's like shooting fish in a barrel to utilise.
If you lot are feeling unsure about this, or if Windows SIM looks too intimidating, input the following respond file into a bare file using Notepad (Figure one).
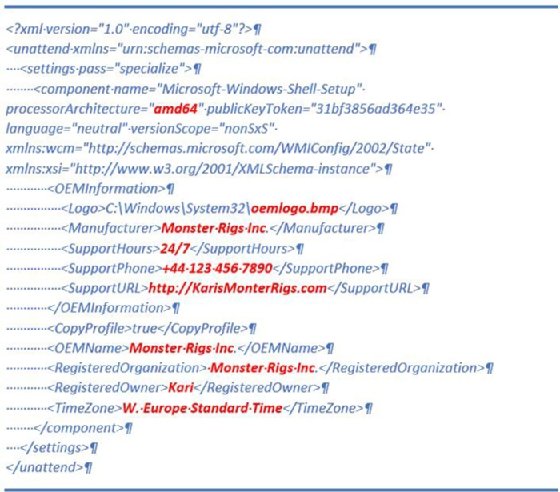
The values shown in bold cherryabove are explained below.
ProcessorArchitecture =adm64 for 64 bit Windows,x86 for 32 scrap
Logo = OEM logo (120*120 pixel bitmap (.bmp)) file
Manufacturer = Whatever you like
SupportHours = text cord (9 AM to 5 PM, 10:00 – 18:00, 24/7 etc.)
SupportPhone = whatever phone number
SupportURL = any URL
OEMName = Whatever yous like
RegisteredOwner = Whatsoever you like
TimeZone = Every bit per Microsoft time zone names
All the preceding answer file components are optional, except ProcessorArchitecture -- this component is mandatory. If you exercise not need or want to fix a time zone, for example, you should remove this line:
<TimeZone>W. Europe Standard Time</TimeZone>
When yous're done customizing the answer file, relieve it as unattend.xml. You should create a new folder on Microsoft OneDrive and proper noun information technology "Deployment Assets." Save your answer file in this folder.
Next, prepare an OEM logo image if one is needed. Any bitmap epitome (.bmp) volition exercise, but its size must be exactly 120 x 120 pixels. Save the epitome equally oemlogo.bmp in the Deployment Assets folder.
Modify groundwork images, colors, sounds and screensavers on your host machine, so save your settings as a theme file. Salvage all the themes you'd like to include in the custom ISO into your Deployment Assets folder as well. This folder is where you'll find the items you need to customize your ISO once more and once more.
ii. Update and customize Windows, install software
When Windows installation is done, the final setup out of box experience (OOBE) begins. The procedure stops to let y'all to select the region merely instead of doing that, press Ctrl + Shift +F3.
Windows interrupts its normal setup and restarts in audit style, a special customization fashion for Windows. Considering no user accounts exist on the desktop yet, it signs yous into audit style using the built-in administrator business relationship. Click on "Cancel" to close it, and then change the brandish resolution if the default 1024 x 768 is too small for y'all to work in.
Y'all can now install your software and update Windows. Practice not run whatsoever programs yet. If, for example, the installer shows "Run this application now" selected in a last prompt, unselect it and close that installer. Do not install whatsoever hardware drivers -- even those that Windows Update installs automatically volition be removed subsequently. If whatever installer or update requires a restart, practice it. Windows returns to audit manner later on restart. If you want to download software, y'all must use Microsoft Border.
Import the Deployment Assets yous prepared while Windows was installing on your technician motorcar. If you saved avails on OneDrive, sign into your OneDrive business relationship. Download the oemlogo.bmp file and save it to the C:\Windows\System32 folder. Do the same for the reply file unattend.xml and save information technology to the C:\Windows\System32\Sysprepbinder. Information technology is important for y'all apply these file names exactly every bit shown, and to save them to the folders specified.
Customizing the installed image
You exercise non need to save the Windows themes that you prepared. Select a desktop theme on OneDrive and instead of saving it, select Open to utilise it to the technician machine. Because Windows is not activated in audit mode, you cannot utilize personalization options (e.1000., themes, colors etc.). Applying an imported theme is your simply ways to customize theme and desktop appearance.
Open File Explorer and customize it as you like. You can adjust icon size, hide or show the Ribbon, bear witness particular selection boxes, bear witness Details or Preview pane, show Libraries in Navigation pane and then on.
The following PowerShell command exports your current Start layout to the file named C:\Windows\System32\MyStart.xml:
Export-StartLayout C:\Windows\System32\MyStart.xml
When you lot've exported the file, open up the Grouping Policy Editor with the command Win + R, type gpedit.msc. The Group Policy Editor is not available in Home and Single Language Windows ten editions. Browse to Local Computer Policy > Administrative Templates > Start Menu and Taskbar in the left-hand pane, then double click Offset Layout on the right-mitt pane.
Enable policy past enteringC:\Windows\System32\MyStart.xml as the Start Layout File, then click on OK to save that policy.
This policy forces each user account to apply your customized Start layout.
Two batch files are still missing from this customization. They run once each time a new user signs in for the starting time time. The first file resets File Explorer's Recent Files and Quick Admission. To build this file, blazon or copy and paste the following two lines into a new Notepad text file:
echo Y | del
%appdata%\microsoft\windows\recent\automaticdestinations\*
del %0
This batch file resets Quick Admission and then deletes itself because it only exists and runs when a new user signs in for the outset fourth dimension. In Notepad, select File > Save As, type%appdata% in the address bar in the Save As prompt, then printing Enter to open AppData\Roaming folder.
Browse to the binder named Microsoft\Windows\Start Bill of fare\Programs\Startup.Salvage the file equally RunOnce.bat and select "Save As type: All files" in Notepad's Save As prompt.
The second batch file is a Visual Basic Script (.vbs) file. Its purpose is to greet new users the first time they sign in, after which it deletes itself. This file is optional, merely it is something yous should probably include in your customized images. Blazon or copy and paste the following text into a new Notepad text file:
Dim WshShell, Welcome Set WshShell = WScript.CreateObject("WScript.Shell") Welcome = WshShell.Popup("Welcome to customised Windows 10 with pre-installed software.", 60, "Windows x", vbOKOnly) Select Example Welcome case one MsgBox "Following software has been installed: Office 365 (2016), Adobe reader, VLC Player, Chrome, Firefox and Opera. Y'all will also notice some pre-installed themes in Settings > Personalize > Themes.", vbOKOnly, "Windows 10" Finish Select MsgBox "Take Fun with Windows 10!", vbOKOnly, "Windows 10" DeleteScript() Function DeleteScript() Set objFSO = CreateObject("Scripting.FileSystemObject") strScript = Wscript.ScriptFullName objFSO.DeleteFile(strScript) Finish Function Save this file every bit Welcome.vbsto the same binder where you saved RunOnce.bat. Again, select the "Save As blazon: All files" selection in Notepad'southward Save As prompt.
If you like, y'all can also prepare both the unattend.xml and Welcome.vbs files on the host while Windows is installing.
3. Generalize Windows image with Sysprep
One small -- but important -- step you must take earlier running Sysprep is creating a partition on the Hyper-V VM to store a captured Windows paradigm. If y'all are using a concrete PC as the technician machine, this is unnecessary. Instead, you can just use an external HDD or wink bulldoze to store that image.
Create gratis space in Disk Management
Open Disk Management and shrink the original C: partition to create free space for a new partition in which to capture a Windows prototype. Information technology needs to exist big enough for the install.wim file you'll capture later. For example, a custom Windows 10 Pro x64 ISO could include the post-obit software pre-installed: Office 365 Concern, Macrium Reflect, Opera, Chrome, Firefox, VLC player, Adobe Reader, Malwarebytes, TeamViewer, 7-Zip, Notepad++, and other software that varies from build to build.
As described, this results in an install.wim file that's between 5 to half dozen GB in size. To compensate, you usually subtract 10 GB (ten,240 MB) from C:. That's plenty for about users. Then, exit Disk Management.
To help identify key partitions later, rename the system drive C: to Windows and the new division to Prototype or any other distinctive proper noun. Create a new folder on the new capture drive (Due east:) named Scratch. Yous will demand it when capturing the image as a temporary working folder using the DISM command.
Prep and run Sysprep
If y'all are running a Hyper-5 VM, create a checkpoint now. If you are using another virtualization program, create a snapshot. If using a concrete PC, y'all should create a system image now. Checkpoints and snapshots accept just a minute, while imaging a physical PC takes a fleck longer.
Check that the born admin'due south or current user's Downloads binder is empty and that no software installers or assets are left there. Run Disk Cleanup to remove all temp files, Recycle Bin content and other bloat.
To run Sysprep, open the command prompt. The desktop volition automatically drag it because you are signed in using the built-in administrator account. Run the following command:
%windir%\system32\sysprep\sysprep.exe /generalize /oobe
This command runs Sysprep with Generalize and OOBE switches then shuts down. The Generalize switch removes all hardware-related information such as drivers and registry entries, resets Event Viewer, removes all shadow copies -- restore points -- and disables the built-in administrator account.
The OOBE switch forces Windows to run its setup phase the adjacent fourth dimension Windows boots from this image as if it were a normal Windows setup. Because Windows was generalized, it generates a new unique SID for each such installation.
Sysprep reads the reply file unattend.xml from C:\Windows\System32\Sysprep binder. In this example its well-nigh important line reads <CopyProfile>true</CopyProfile>. When true, CopyProfile copies all our customizations to the default user profile in the subconscious Default folder in the Users folder. That contour is used equally the base profile whenever a new user account gets created.
iv. Capture Windows image, create the ISO
Once Sysprep finishes working its magic, the Windows 10 installer shuts down. Boot the technician machine using the Windows 10 install media -- the same you used in the commencement to install Windows. Do not let it kick from hard disk drive, an HDD or SSD if using a physical machine or VHD if you lot're using Hyper-V.
At the kickoff prompt when Windows setup asks for region and linguistic communication settings, instead of selecting anything and starting installation, printing Shift + F10 to open up the Recovery Console Command Prompt. Blazondiskpart and printing Enter to start the disk partition utility, so blazonlist vol to list all bachelor volumes, or partitions. For this example, the Hyper-V VM list vol shows this information:
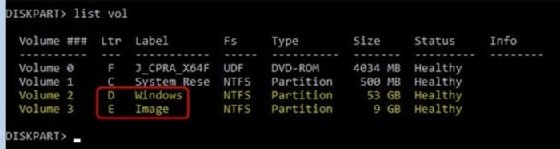
You tin can come across why it'due south important to name the disk partitions then you can identify them easily.
Note that the Recovery Console does not employ the same drive ID policy as Windows ten. You lot need to be certain which drive has Windows installed and which drive will store the captured prototype for customization and re-use.
Blazonexit and printing Enter to leave the disk division utility.
Enter the following command:
dism /capture-image /imagefile:E:\install.wim
/capturedir:D:\ /ScratchDir:Due east:\Scratch
/name:"W10PROx64" /compress:maximum
/checkintegrity /verify /bootable
Cheque and annotation the post-obit important details:
- /imagefile:Eastward:\ = drive where install.wim volition be saved
- /capturedir:D:\ = drive where Windows is installed
- /ScratchDir:East:\ = drive where temporary working binder Scratch is located
- /name: = any proper noun you like in quotes, not important but obligatory, here you tin see the version of Windows: 64-bit Win10 Pro
Press Enter to kickoff.
This volition take some fourth dimension to complete. On slow physical machines, it tin take upwardly to xx to 25 minutes. During the first one-half of that period, you won't see a progress indicator.
When this control has finished, eject the install media -- in Hyper-V select Media menu > DVD Drive > Eject. Next, shut the command prompt and restart the technician automobile. This time, kick normally from HDD or VHD and let it work through normal OOBE setup.
While the technician automobile is preparing and setting upwards Windows, right-click the original Windows 10 ISO image you used to mount it on the host calculator as a virtual DVD. Then, open up it in File Explorer and copy its entire contents to a new folder on the host HDD.
When the technician car is set and your initial user is logged into the desktop, copy your newly created install.wim file from the image drive (E:) to the Sources subfolder in the binder where you lot copied the original Windows installation files. In this example, that'south D:\ISO_Files\Sources folder. It will replace the original Windows 10 install.wim file.
Hyper-Five users should as well create a checkpoint now on their technician VM to capture a pristine system image.
Windows imaging tools
Run Deployment and Imaging Tools Environment elevated as an admin. It is installed as part of the Windows ADK and y'all can find it in Starting time > Due west > Windows Kits. Type CD\ and printing Enter to set the working folder to the root of the C: drive. Enter this command:
oscdimg.exe -g -o -u2 -udfver102 -bootdata:2#p0,east,
bd:\iso_files\boot\etfsboot.com#pEF,due east,
bd:\iso_files\efi\microsoft\kicking\efisys.bin
d:\iso_filesd:\Win10PROx64.iso
The preceding command is one long continuous command line though it breaks beyond multiple lines in this article.
Check and the note following details:
- d:\iso_files = path to folder where you copied original install files
- d:\Win10PROx64.iso = path and your preferred name for new ISO
With all this work completed, making the ISO takes just a minute or ii. When that's done, you can burn the ISO to a DVD or flash drive; it will work on both BIOS/MBR and UEFI/GPT systems to install your customized Windows with its pre-installed software.
5. Update or change the ISO
The beauty of using Hyper-V VM every bit technician auto lies in how easy it makes the job of maintaining and updating a customized install paradigm. For example, Windows Insider: Fast Band receives new pre-release builds frequently and participants may want to upgrade their ISOs at the same pace.
When you feel like changing the ISO, you tin can simply employ the Hyper-V technician VM's standard checkpoint you should have created only before running Sysprep Windows. You can add and remove software, update software, run Windows updates, utilize a new theme or practice whatever else you might need to do.
When that'due south done, you should run Deejay Cleanup, create a new checkpoint so you can restore to this point, repeat Sysprep, capture a new install.wim and make a new ISO. This process will be much faster now. The whole process takes only minutes because both Windows and basic software are already installed.
Upgrading the custom ISO
As a Windows Insider, you might also be interested in upgrading the ISO. When a new build arrives, you should restore the checkpoint you created when the technician machine was fully ready subsequently capturing the install.wim file. You lot can't use the checkpoint made in inspect mode before Sysprep, considering upgrading Windows in audit mode is not possible.
One time y'all've booted to normal way, you can upgrade to the latest Insider build or the side by side feature update build using Windows Update or a standard ISO paradigm. When that upgrade completes, enter the following control in an elevated command prompt to restart Windows in audit mode:
%windir%\system32\sysprep\sysprep.exe /audit /reboot
Windows restarts, so signs into inspect manner using the built-in ambassador account. Your initial user account already exists, so yous should open Settings app > Accounts > Other users and delete all existing user accounts and their profile folders.
You should also delete the custom install.wim file from last time if it'south still located on the image bulldoze -- Eastward: in this example -- and check to ensure that the Scratch folder still exists. If not, you must recreate it manually.
Source: https://www.techtarget.com/searchenterprisedesktop/tip/How-to-create-a-custom-ISO-for-Windows-10
Posted by: howellmagery.blogspot.com
0 Response to "How To Create Iso In Windows 10"
Post a Comment